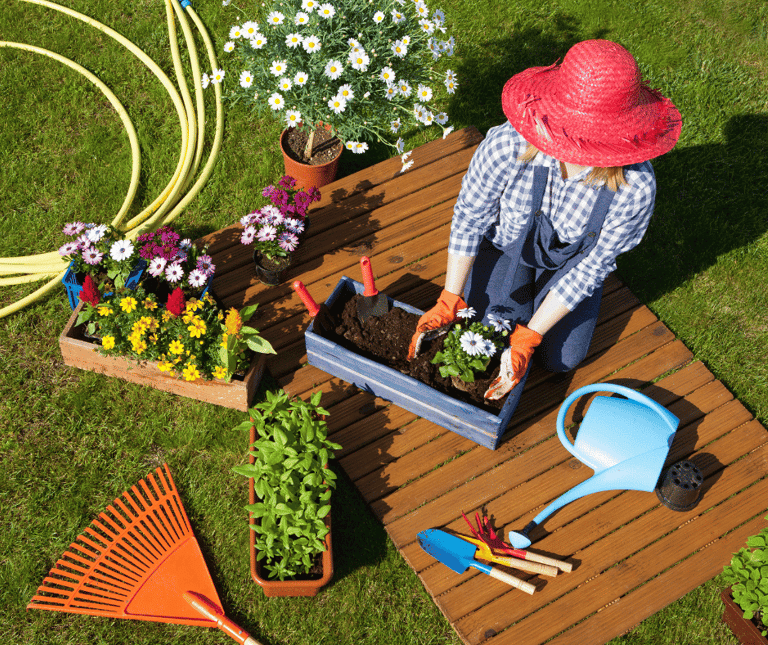
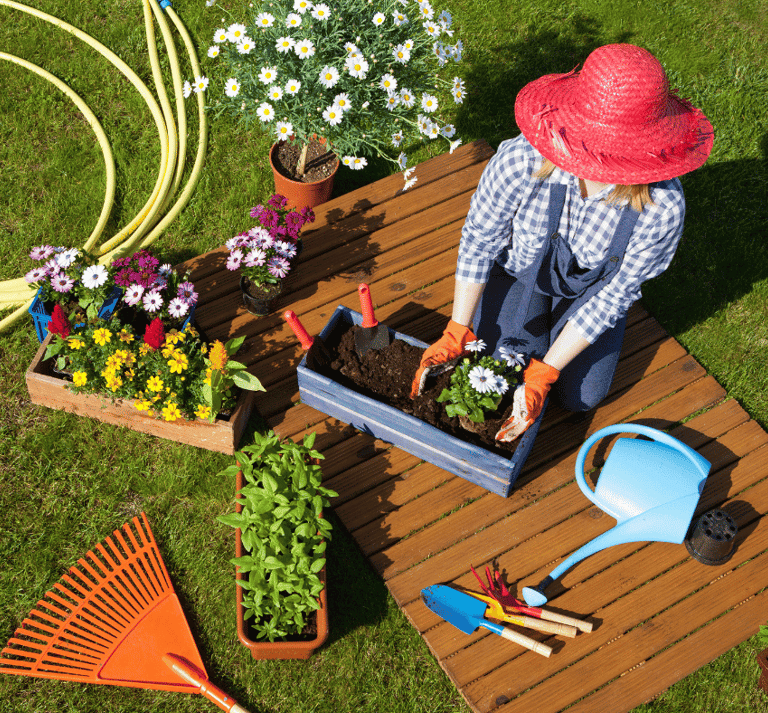
How and When to Transplant Seedlings
Have you been nurturing seedlings indoors and wondering when and how to transplant them? This blog aims to clarify proper transplanting techniques and empower you to transplant your young plants successfully.
8/28/202310 min read
How and When to Transplant Seedlings
Disclaimer
This How and When to Transplant Seedlings article contains some affiliate links. The small commission we receive if you choose to purchase goes towards making this gardening education available for free! We do not affiliate for anything we do not personally use. Thanks so much for your support!
Transplanting, an often overlooked technique
How and When to Transplant Seedlings
3 Steps for Transplanting Success
If you're wondering how to transplant your seedlings successfully and when the best time do to it is, look no further. Below we explain:
When to Transplant Seedlings
How to Transplant Your Seedlings and discuss
Transplanting FAQs
1. When to Transplant Seedlings
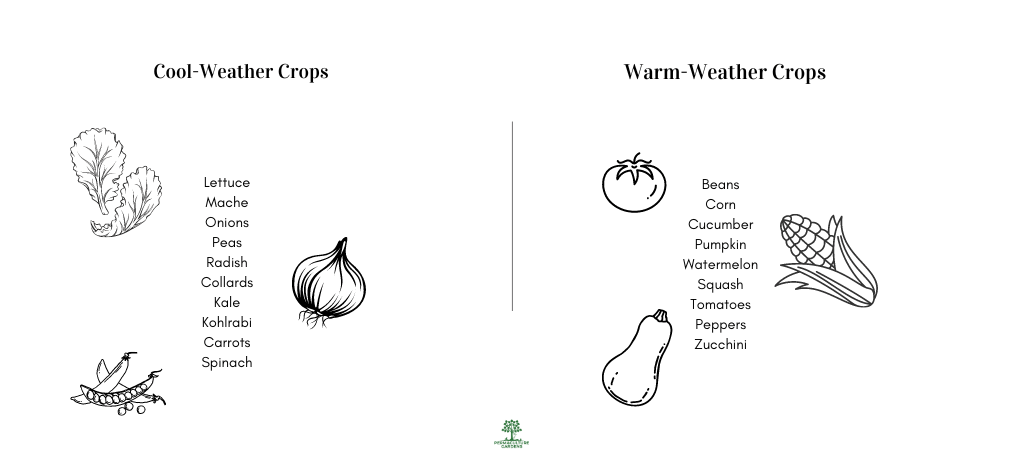
Plants in temperate climates can be organized according to weather: Cool-weather and Warm-weather crops
Spring Transplanting
There are two major categories of annual vegetables in the northern and southern hemispheres: "cool-weather crops" and "warm-weather crops."
In the spring, transplant cool crops before warm ones. The optimal transplanting times for most cool-weather crops are in the early spring.
Transplanting early in the year increases the time for you to harvest and enjoy cabbages and lettuces. So, take advantage of the rising but mild spring temperatures to plant crops like peas, spinach, broccoli, turnips, collards, and Brussels sprouts.
In general, in the temperate zones, when your days consistently hit the 60s F (15.5 C) and your nights don't dip below 40F (4.4 C), it is an excellent time to transplant cool-weather crops like peas and leafy greens.
Transplant when the weather is consistently above freezing and within the allowable germination temperature range of your plant.
Most summer crops germinate at a temperature above 60F and most cool weather crops around 40F.
In spring, even if your daytime highs are above 60F, your nighttime lows may still be dipping below these preferred temperature ranges. So pay close attention to both your highs and lows.
As the daytime temperatures consistently rise to 70F (21 C), you can grow more popular summer crops like tomatoes and melons. Just note that the window for planting most cold-weather crops will close as it gets hotter.
Here are a few examples of seeds and their optimal germination temperatures:
Fall Transplanting
The gardening season in North America is mostly associated with spring planting, leaving the fall as a time when people "close" their gardens for the year. This phenomenon is a shame because you can get a second wave of your cool-weather crops in a single year when you plant in the late summer through the early fall.
Take the list above and flip it so that you transplant the seedlings that require higher temperatures to thrive before you plant those that can tolerate the cold.
For instance, peas and fava beans are considered "tender crops" that do not like extreme heat or cold. Plant these kinds of vegetables before the hardier, more frost-tolerant crops such as mache and carrots.
Here is a list of crops you would plant in the late summer (July) through early fall (September) so that you harvest in the fall.
Successfully harvesting your second wave of lettuces, radishes, peas, and carrots largely depends on planning and planting ahead of time. This means starting your fall seeds in the mid-summer.
Planning may also involve researching some of the more frost-tolerant varieties of cold-weather crops you like to grow. (In the late spring, this may mean knowing which cool crops are less prone to bolt with heat.) Choosing plants, according to frost tolerance, can help you extend your harvest long after Thanksgiving.
You may be used to growing Romaine lettuce. But if you knew of a variety of lettuce called Big Boston (known to produce even in the snow), why not grow both types? Even if your Big Boston dies, you may still be able to harvest from it weeks after your romaine lettuce has died. Planting several different varieties of your cold-weather crops is an example of building redundancies in your garden. These redundancies increase your garden yields.
According to those who plant by the phases of the moon, the moon's "second quarter" (specifically, two days before the full moon) is the best time for transplanting crops that have their "seeds inside the fruit," such as beans, melons, peppers, squash, and tomatoes. These kinds of plants happen to be mostly summer crops.
The Farmer's Almanac tells us that those crops we eat below ground, such as the roots and tubers of carrots, potatoes, and onions, grow better when transplanted during the "waxing of the moon," or after the full moon.
Biodynamic gardeners note that the moon's energetic action on plant growth below ground and above ground is in line with the moon's gravitational pull on the ocean tides' rising and falling.
Here's a handy Planting by the Moon Phase website.
If you don't get this moon phase quite right, do not fret. The most important thing is that you transplant successfully during your seasonal windows of opportunity and do not let your seedlings die.
Transplanting By the Moon
The full moon is the best time for transplanting fruiting vegetables.
Tips Before You Transplant
Make sure that your seedling is about 2-3 inches high before transplanting.
We also recommend transplanting a seedling after its two "true leaves" first come out.
Most flowering plants form two leaves upon germination. These plants are known as dicots (as opposed to monocots) because their first leaves are the "cotyledons." These are not their "true leaves."
True leaves are the leaves that grow after the initial seed's cotyledon leaves come out. Not all plants have prominent cotyledon leaves. So transplant after you see at least two sets of leaves (four leaves) grow.If your seedlings become leggy (too long), that is a sign that they are outgrowing their current trays or pots and are longing for more soil to grow in. (It could also mean they are reaching for a light source.) If you cannot transplant outdoors due to temperature, transfer them into a larger tray or cell pot as soon as you can.
Another word for this is "pricking." We recommend 4.5-inch deep square pots for "pricking" because they fit very nicely into the 1020 trays that we recommend for starting seeds.Make sure that half the root and stem structure go underneath the soil when performing the transplant.
Check Your Seedlings
"The point at which to transplant seedlings is when they are 2 to 3 inches high in the seedling flat. Exceptions are noted in the Master Charts of (the book) How To Grow More Vegetables."


The Master Charts John mentions above are invaluable in planning, starting, and transplanting your seedlings at the right times of the year. These charts have plant-specific data on yields and even caloric value.
The depth of garden information, among many other reasons, is why we recommend this book to our clients in our Grow-It-Yourself program.
Harden your seedlings outside before you transplant them. Even just one day of hardening helps. One to two weeks in the spring is best practice.
Transplant before, during, or after a rain event and take advantage of rain doing the watering for you. If rain is not in the cards, make sure to water the seedling tray and your garden bed heavily before you transplant.
Transplant during the cooler times of the day to avoid "transplant shock." This practice is a perfect example of "working with nature" and not against it. If you transplant during rainy weather, you don't need to worry about watering your plant!
Temperature / Weather
Transplant so that when your seedling leaves out and grows to full maturity it covers out any gaps in the soil to prevent weeds!
Transplant to maximize growing space.
Have you ever planted a tray of seeds according to the seed packet directions and are left over with half a packet or more?
Or have you planted tiny seeds, broadcasted the seed around the tray, and ended up with patches of intense growth that you have to separate (usually unsuccessfully) to transplant?
In the article, “How to Grow Plants from Seed” we discussed how to properly space your seeds on a 1020 tray. We want each seed to have enough room around it to grow while using the least amount of space needed for germination.
This philosophy of maximizing space carries over into the garden when you transplant the seedlings outside. Transplant the most amount of plants in the least amount of space.
2. How to Transplant Seedlings
When you transplant a few tomato plants or squash, the technique doesn't matter that much because it only takes a few minutes to bury the roots and these plants are pretty good at adjusting to curling or bent roots.
Use a “dibber.” A dibber is anything used to poke neat holes into which you would plop your transplant.
Planting leafy greens takes quite a few plants to produce a decent harvest, and the roots are pretty long and delicate.
Benefits of BioIntensive Planting
Instead of transplanting in rows, Grow Biointensive recommendations are to plant using hexagonal spacing where the plants are close enough to touch their leaves when they are at full size.
In addition to allowing you to grow the most plants in the same space, the foliage as it develops will start to cover the bare exposed soil and significantly reduce the effects of evaporation.
Since we started implementing biointensive techniques to start our seedlings, the stress of getting seeds into the garden has largely gone away.
We still have difficulties starting certain perennial plants from seed. Still, for most vegetables, flowers, and herbs, it's a simple, repeatable process that helps me focus more on seasonal timings and harvests.
There are a few additional tips on transplanting to point out:
Transplant using a dibber to make the perfect indentations in the soil for your seedlings.
The following are the materials you need for transplanting your seedlings:
A"dibber" - A "dibber" or "dibble" is any "hole poker" that you can use to make indentations in the soil to accommodate the plant's root system.
Spade
A watering can filled with water or hose with a nozzle spray
Your seedlings
Note: You will be more successful in transplanting seedlings without gloves. The roots of plants are fragile, and you'll need as much control as possible to ensure that they are kept intact in the process.
Materials for Transplanting
Using a dibber, make a hole in the soil deep enough so that one-half of the plant and all of its roots are under the soil.
If your roots are long, make sure to not only make a hole but a shaft that goes down far enough so as not to compromise root growth during the transplant.
If your seedling comes in a biodegradable pouch that will break down and not impede root growth, make a hole large enough for the whole pouch. Use a space or shovel, as shown in the video below. Doing this is an excellent way to keep "plant stress" at a minimum. Sometimes, these root pouches need to be broken up, and the roots freed and spread apart to help the plant grow optimally.
)
How to transplant

Dave shows how to transplant seedlings successfully. A video from the course included in our GIY Program
Heavily water the area you have prepared for the plant.
Heavily water the plant or seedling tray before transplanting.
Hold your plant by the "ears" or two true leaves and retain as much of the original soil around its root system as possible when you transplant.
Gently transfer the plant into your hole.
Cover the transplant with a good mound of soil so that one half of the plant is below ground, and the other half is above.
Water again.
Using a dibber, make a hole in the soil deep enough so that one-half of the plant and all of its roots are under the so
Transplanting a flat of 180 plants can quickly take over an hour with a dibber (pictured above).
However, we've discovered that using a straight-edge shovel plunged vertically into the plant line and then wedged over yields a big enough gap to dangle in a half dozen seedling roots quickly.
You then remove the shovel, let the soil spring back without too much disturbance, and pin the roots naturally with a bit of patting to remove the shovel line.
With this technique, you can easily transplant a flat in about 30 minutes, which helps when you have a 2-year-old son who loves to come along behind you and yank out the seedlings I just planted.
Transplant Using a Shovel instead of a Dibber
Transplant when your seedling has its two "true leaves."
Can you transplant seedlings to early?
3. Transplanting FAQs
Yes, you can transplant seedlings too early. This happens when temperatures are not yet consistently above 60F during the spring, and a sudden frost or snow comes in.
These temperature fluctuations can happen in the early fall as well.
In the spring, it can be beneficial to "harden" your seedlings in trays outdoors for 1-2 weeks before transplanting the seedlings into the garden beds. Hardening means placing your protected seedlings or seedling tray outdoors to get used to winds and changing temperatures.
In the fall, hardening is easier to do since the weather is warmer outdoors, and snow is generally unexpected.
If snow or hale is possible, use a cloche or light row cover to protect fragile baby plants.
How big should seedlings be before transplanting?
Seedlings should be at least 2-3 inches tall before transplanting and should have their two "true leaves."
If you've followed all the recommendations above and your transplant still dies, ask the following questions:
Is your soil dead (meaning, is there no beneficial microbial life in your soil?)
Did your seedlings develop a healthy root system before transplanting?
Get to the root cause. Pun intended.
Never give up.
Be tenacious, experiment, and re-read this article.
And try again.
Help! My transplants died!
There is!
Wish you could get reminders on your phone or email to transplant your lettuce or carrots?
We have an app for that!
Sign Up for SAGE, our permaculture garden app, and take the headache out of growing food.
SAGE makes it possible to finally grow food without getting confused about:
Knowing what to plant
Knowing when to plant and
Designing your garden with permaculture in mind!
Isn't there an app that can just remind me about when to transplant my seedlings?
Our SAGE garden planning app allows you to plan & design your food garden so you don’t waste hours wondering what to plant and when to plant it!
I WANT TO GROW MORE
Sign Up for a
Permaculture Garden Course
I AM A BEGINNER
I WANT MY DREAM GARDEN
Sign up for the
Grow-It-Yourself Program
Everything you need to start a garden
may be hidden in your pantry.
Take a self-paced, step-by-step garden course to help you grow right from seed to harvest.
Make Your Organic Food Garden A Reality with
a garden mentor
a community
an app &
a proven plan!
Choose one next step.
Which of the following are you?
Permaculture Gardens - your online resource for organic & sustainable gardens.
Contact
permaculturegardens@gmail.com
Bethany Farm
41558 Stumptown Rd.,
Leesburg, VA 20176